Building a Browser: Part 1 Loading a Page

Introduction
In this series of articles, we will be building a very basic Web Browser. Browsers are extremely complex and massive beasts that have to deal with tons and tons of Web API specs, languages, and edge cases. Our browser will completely ignore most of these specs and be a very simple slice into how browsers work, giving us a view into the end-to-end workings of a browser without being encumbered by the nitty gritty details.
This article series is a high level view based on this great book on building a Web Browser.
In this article, we will be going over the first part of the book to load and display text content on the page. We will obey some html tags — like italics and bolding — but for the most part, it will just be a text dump. Our browser UI at this point will be quite limited as well, only allowing us to scroll up and down.
The current state of our browser can be found here.
Getting the Content
The first step in creating a browser to view web content is actually getting the content into the browser. Our browser will work by getting a resource at a url.

The url has three parts that we will concern ourselves with:
- The scheme is the protocol that will be used to access the resource, we will only build our browser to support http and https for now, but modern browsers also support schemes like file (for local files) and data (for data urls).
- The hostname will tell us where to send our request, the OS we run our browser app on will use the hostname to talk to a DNS server and get the ip address to send our request to
- The path will be sent in the request to tell the host what resource we are asking for
class URL:
    def __init__(self, url: str):
        self.scheme, url = url.split("://", 1)
        assert self.scheme in ["http", "https"]

        if "/" not in url:
            url = url + "/"
        self.host, url = url.split("/", 1)
        self.path = "/" + url

        # figure out correct port
        if self.scheme == "http":
            self.port = 80
        elif self.scheme == "https":
            self.port = 443

        if ":" in self.host:
            self.host, port = self.host.split(":", 1)
            self.port = port
Inside our URL class we take in the url string and extract the three pieces listed above. We also get a port which is 443 by default for https and 80 for http — but websites CAN be run on custom ports and for that reason we allow the parsing and use of these custom ports if they are present in the url.
Downloading
Now that we have extracted the components from our url, we can use them to actually make an http request. This piece is very scheme specific and would vary greatly based on what scheme we are using. For our browser where we are always using http, we can just put our http_scheme_request logic into the request function.
def request(self):
        sckt = socket.socket(
            family=socket.AF_INET,
            type=socket.SOCK_STREAM,
            proto=socket.IPPROTO_TCP
        )

        sckt.connect((self.host, self.port))
        if self.scheme == "https":
            ctx = ssl.create_default_context()
            sckt = ctx.wrap_socket(sckt, server_hostname=self.host)

        # Send the request to the host
        request = "GET {} HTTP/1.0\r\n".format(self.path)
        request += "Host: {}\r\n".format(self.host)
        request += "\r\n"
        sckt.send(request.encode("utf8"))

        # get the response
        response = sckt.makefile("r", encoding="utf8", newline="\r\n")
        statusline = response.readline()
        version, status, explanation = statusline.split(" ", 2)

        # extract headers
        response_headers = {}
        while True:
            line = response.readline()
            if line == "\r\n": break
            header, value = line.split(":", 1)
            response_headers[header.casefold()] = value.strip()
        assert "transfer-encoding" not in response_headers
        assert "content-encoding" not in response_headers

        #get actual content
        content = response.read()
        sckt.close()

        return content
We will use a socket library to actually facilitate the interactions with the web, we use the INET address family and the TCP protocol to let us talk to the internet over http.
If we are using https (i.e. http over TLS) we need to wrap the socket in an SSL context which will verify certificates for us and ensure strong encryption protocols are used on the content being sent.
Then we will actually send our request according to the HTTP protocol
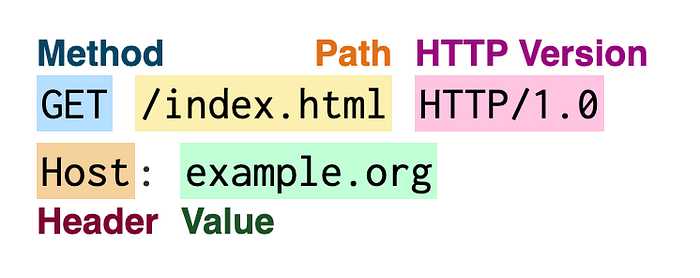
We specify the method we are using, the path we want to hit and the version of HTTP. We only use one header — the Host — which as you can imagine is quite important to tell our socket where to send the request. HTTP requests can have lots and lots of different headers, but for now we will just use the Host one.

We will get back a response from the server that looks like the image above. We will take the status line and just assume it was all good, but normally — of course — a browser would take proper actions based on the status line.
We are also parsing the headers, because we are not ready to handle two specific response headers:
- content-encoding lets the server compress web pages before sending them — which we don’t support.
- transfer-encoding lets the server send chunked data — which we also don’t support
Finally, we can return the raw response body from the request to the caller.
Lexing
The raw response body will go into a function called lex, which will turn our raw body into a list of tokens which are either text or tags.
<p>hello</p>e.x. the above would give us [Token(‘p’), Text(‘hello’), Token(‘/p’)]
def lex(body: str):
    out = []
    buffer = ""
    in_tag = False
    for char in body:
        if char == "<":
            in_tag = True
            if buffer:
                out.append(Text(buffer))
            buffer = ""
        elif char == ">":
            in_tag = False
            out.append(Tag(buffer))
            buffer = ""
        else:
            buffer += char
    if not in_tag and buffer:
        out.append(Text(buffer))
    return out
We keep a buffer to accumulate token content and use the ‘<’ and ‘>’ symbols to determine if we are inside or outside of a tag.
Laying Out Content
We have our list of tokens, but actually figuring out how to show them on a screen is a complex problem that layout engines solve. For a true browser which supports multiple languages and conventions of laying out text, this logic can get very very complicated. Lucky for us, we will just be doing english and only support a small subset of possible tags so our layout code can be somewhat simple.
WIDTH, HEIGHT = 800, 600
HSTEP, VSTEP = 13, 18

class Layout:
    def __init__(self, tokens):
        self.display_list = []
        self.line = []
        self.cursor_x = HSTEP
        self.cursor_y = VSTEP
        self.weight = "normal"
        self.style = "roman"
        self.size = 12
        for tok in tokens:
            self.token(tok)
        self.flush()

    def token(self, tok):
        if isinstance(tok, Text):
            for word in tok.text.split():
                self.word(word, font)
        elif tok.tag == "i":
            self.style = "italic"
        elif tok.tag == "/i":
            self.style = "roman"
        elif tok.tag == "b":
            self.weight = "bold"
        elif tok.tag == "/b":
            self.weight = "normal"
        elif tok.tag == "small":
            self.size -= 2
        elif tok.tag == "/small":
            self.size += 2
        elif tok.tag == "big":
            self.size += 4
        elif tok.tag == "/big":
            self.size -= 4
        elif tok.tag == "br":
            self.flush()
        elif tok.tag == "/p":
            self.flush()
            self.cursor_y += VSTEP
Our Layout class will set up some defaults for the font used on the text tokens. We instantiate the position for the first word and then we iterate through each token.
We split our logic based on if the token we encounter is a text or tag.
Words
To handle laying out text, we will use a separate word function.
def word(self, word):
        font = get_font(self.size, self.weight, self.style)
        width = font.measure(word)
        if self.cursor_x + width > WIDTH - HSTEP:
            self.flush()
        self.line.append((self.cursor_x, word, font))
        self.cursor_x += width + font.measure(" ")
The first thing we need to do is grab a font to associate with the word, we have a helper function to cache and re-use fonts so that we can speed up rendering.
FONTS = {}

def get_font(size, weight, style):
    key = (size, weight, style)
    if key not in FONTS:
        font = tkinter.font.Font(size=size, weight=weight, slant=style)
        label = tkinter.Label(font=font)
        FONTS[key] = (font, label)
    return FONTS[key][0]
The font cache is keyed by a tuple of size, weight and style.
Once we have our font, we need to measure how wide the word would be using that font. If the word is small enough to fit on the line we append it by adding a tuple of its (x, word, font) and move our x cursor over by the width of the word plus one empty space. If our word will not fit on our current line, then we must flush flush the line first.
def flush(self):
        if not self.line: return
        metrics = [font.metrics() for x, word, font in self.line]
        max_ascent = max([metric["ascent"] for metric in metrics])
        baseline = self.cursor_y + 1.25 * max_ascent
        for x, word, font in self.line:
            y = baseline - font.metrics("ascent")
            self.display_list.append((x, y, word, font))
        max_descent = max([metric["descent"] for metric in metrics])
        self.cursor_y = baseline + 1.25 * max_descent
        self.cursor_x = HSTEP
        self.line = []
When flushing a line we need to make two passes, the first pass will find the appropriate y height for the line and the second pass will then add the line items to the display list with this calculated y height.
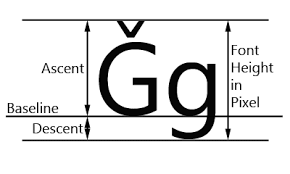
We need to find the max ascent for all our words, which we then use to determine our baseline as y_cur + 1.25 * max_ascent.
In our second loop, we position the words based on the calculated baseline and the word’s ascent. We can then add the tuple of the (x, y, word, font) to our display_list.
We calculate the max_descent of the words on our line and use that value to set y for the next time we need to flush. We also reset the x cursor to the left of our screen and clear our line.
Tags
If the token is a tag, we will get into our else if blocks
elif tok.tag == "i":
    self.style = "italic"
elif tok.tag == "/i":
    self.style = "roman"
elif tok.tag == "b":
    self.weight = "bold"
elif tok.tag == "/b":
    self.weight = "normal"
elif tok.tag == "small":
    self.size -= 2
elif tok.tag == "/small":
    self.size += 2
elif tok.tag == "big":
    self.size += 4
elif tok.tag == "/big":
    self.size -= 4
elif tok.tag == "br":
    self.flush()
elif tok.tag == "/p":
    self.flush()
    self.cursor_y += VSTEP
The action take by a tag depends on what that tag is. Most of the tags we support so far just change our font. /p and br tokens will make a new line.
Browser
We have the ability to get content, tokenize it and create a list of how the text tokens should be displayed. Our Browser is where this will all come together to actually draw something on the screen.
Setting up Browser
Our browser init will handle creating a canvas of specified width and height, and it will create key bindings so that we can scroll up and down the Layout using the up and down keys on the keyboard.
WIDTH, HEIGHT = 800, 600
HSTEP, VSTEP = 13, 18
SCROLL_STEP = 100

class Browser:
    def __init__(self) -> None:
        self.scroll = 0
        self.window = tkinter.Tk()
        self.window.bind("<Down>", self.scrolldown)
        self.window.bind("<Up>", self.scrollUp)
        self.canvas = tkinter.Canvas(
            self.window,
            width=WIDTH,
            height=HEIGHT
        )
        self.canvas.pack()
We have bound the up and down keys to call our up and down functions which change our scroll value.
def scrolldown(self, e):
     self.scroll += SCROLL_STEP
     self.draw()

def scrollUp(self, e):
     self.scroll -= SCROLL_STEP
     self.draw()
Every time we scroll, we update the scroll variable and re-draw the content.
Displaying Content
Now let’s see how our browser uses the URL and Layout classes we just built.
def load(self, url):
    body = url.request()
    tokens = lex(body)
    self.display_list = Layout(tokens).display_list
    self.draw()
We get our raw body → we lex it to get a list of tokens → we pass those tokens to our Layout to construct a display_list → we draw!
def draw(self):
     self.canvas.delete("all")
     for x, y, text, font in self.display_list:
          if y > self.scroll + HEIGHT or y + VSTEP < self.scroll: continue
          self.canvas.create_text(x, y - self.scroll, text=text, font=font, anchor="nw")
Each draw call clears the canvas and then iterates over the display list. For each word, If y is within the bounds of (scroll_pos, scroll_poss + HEIGHT), then we draw it on our browser’s canvas at the appropriate position.
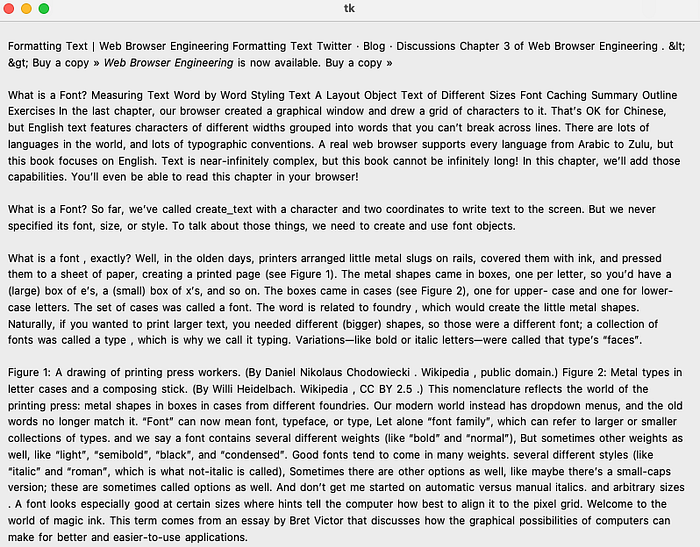
Below is the result of running our browser using this main.py.
if __name__ == "__main__":
    Browser().load(URL(sys.argv[1]))
    tkinter.mainloop()
With command python main.py https://browser.engineering/text.html
Conclusion
In this article, we learned how browsers request raw content based on the different schemes in the URL they are given. We saw how the content is lexified into a list of text and tag tokens and how a complex Layout engine is responsible for taking in those tokens and spitting out a display list which has information about each word’s x position, y position and font. Finally, we saw how our core Browser code brings it all together, coordinating the flow of data from URL → Lexer → Layout Engine and then we saw how we can draw and re-draw the display list and use browser properties — like scroll amount — to pick which parts of the display list we will show.
This was quite a bit to chew through in one article, but we already have a pretty cool browser that can display some basic HTMLs from live urls on the web!